
Martin Holladay of Green Building Advisor wrote a great article on our house. Read it here: http://www.greenbuildingadvisor.com/blogs/dept/musings/vermont-house-uses-only-half-cord-firewood
Baby, it’s cold outside!


It’s currently -9° out with a real feel of -26°. We had a small fire in our tiny wood stove earlier today which kept us warm and cozy all day. We just lit another fire – because we can. The inside temp quickly shot up 3 toasty degrees. I’d say that whole passive solar/well insulated thing is working quite nicely. Keep warm, New England!
windows and more!
Finally… the long overdue post. I am going to keep this to mostly pictures. We have had a lot going on and we are getting closer to moving in – which should happen by the end of the month! Tomorrow appliances arrive and later in the week we should have countertops installed, bathroom floor tile put in, lighting installed, and much more. It’s a busy week!
We still have a few more things to do on the exterior (first floor solar overhang/awning, porches, etc) but for now we’re really concentrating on the inside so that we can start moving some things in.
Click on any of the pictures to open up a slideshow view. Enjoy!


making the grade
The excavator was back on site last week and started to establish the finished grade around the house. Here’s what they’ve done so far.
Before

After

Looking south


Next week they’ll be digging the trench to run the water pipe between the well and house. They’ll also be installing the septic system. Besides that we’ve been at a standstill waiting for the windows that have been held up in customs in D.C. For some reason they’re inspecting every shipping container twice. Can’t do the siding, can’t sheetrock, can’t do the flooring upstairs. Just waiting.
this sucks, that blows
First off, the roof is done. Corrugated galvalume roofing came precut to order. Some drip edge put down then the panels were pre-drilled. Then screwed to the roof sheathing.

The chimney for the wood stove with its supports and snow guard. Kinda like a cow catcher on a train. Keeps sliding snow from wiping out the chimney.

The insulator was onsite the last few days blowing insulation in the wall cavities and attic spaces. He’s got a sharp aluminum tube on the end of that hose. Like a big hypodermic needle. He jams it in a section, blows it full of cellulose, then tapes over the holes.

The attic gets 30″-36″ of loose fill cellulose. The walls are dense packed cellulose between the Mento, the TJIs and the osb sheathing/vapor barrier. If you touch the Mento it feels like a firm mattress now.
Attic over the kitchen.
House gotta breath they tell me. So the HRV is the thing that controls the ventilation in a tightly sealed house. It takes “stale” air from inside the house and exhausts it to the outside. It brings fresh air in, but passes the fresh air through a heat exchanger that recovers over 90% of the heat of the outgoing air. It uses about 17 watts when running in the normal mode. It does one full air change every three hours. It can be put into a high speed mode to clear out steam from showers or to vent from cooking. The supply vents are in the bedrooms and the returns are in the kitchen and bathrooms. The kitchen vent has to be at least 8 feet from the stove so it doesn’t pick up a ton of grease.
Return boxes like this take exhaust air to the main unit. White cap is a dust cover that will get replaced with a grate once the wall board guys are done making dust.

A supply box with dust cover.

Flexible HDPE medical grade tubing. Not sure what the medical application would be. Seems like it would hurt.

Tubes are run from vents to main unit through the open web floor joists.

To get upstairs the tubes are run through 3″ holes drilled through bottom plate of the stud walls. This keeps the tubes inside the 2×4 wall. 
A rubber gasket like this…
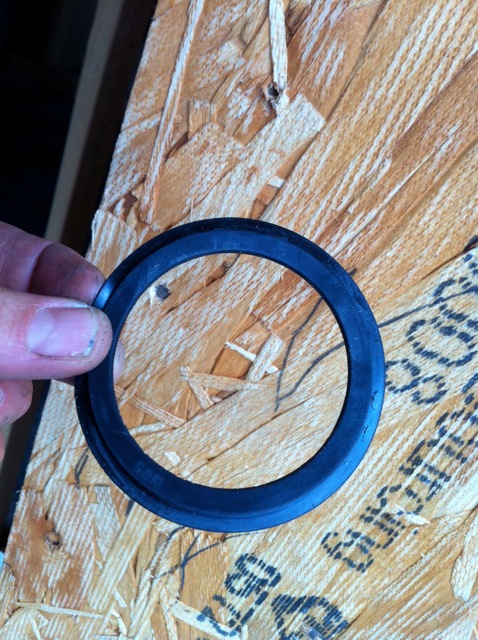
…is put over the last ridge of the pipe.

A little liquid soap is used to lubricate the fittings and the tube is pushed in. Notice the grooves cut into the side of the female fitting.

Once the tube is in place a clip is inserted in the grooves to hold the tube in place.

Done.

At the other end the tubes are run to the distribution manifold on the HRV. A hacksaw is used to cut them to the correct length.

The tubes are connected to the manifold in the same manner as the vent boxes.

In our place there are six supply and six returns. The silver boxes are “silencers” that remove fan noise.

The silencers are attached to the main unit that contains the fans, filters and the heat exchanger.

The outside supply and return ducts will be run later. The windows are coming up from D.C. next week. Once they’re in it’s onto siding and sheet rock.
Mento – the fresh maker?

The house is now all nicely wrapped in a weather barrier called Mento. The experts will tell you that house wrap has come a long way since Tyvek was first introduced. Mento “manufactured by the German company Pro Clima and distributed in North America by Four Seven Five, is a vapor-permeable, non-woven, polypropylene weather-resistive barrier designed to help buildings meet Passive House standards.” Essentially, the Mento forms the outer barrier for the blown in insulation, which will sit between that and the OSB (plywood) that you could see in earlier pictures. Wood strapping, helps add additional support, as well as serve as anchor for the siding (pine ship-lap). The Mento allows moisture to easily dry out and therefore prevents mold, rot, etc from forming inside the wall structure.
While the Mento is establishing a clean, fresh environment for the insulation, the rest of the house, thanks to all that blue tape you saw earlier, is staying well sealed and isolated from the outside temps. This is where the air source heat pump, also known as reverse-cycle air conditioner comes in. Simply put, the ASHP transfers heat. Using a heat exchanger very similar to that of a refrigerator or air conditioner, the ASHP works somewhat in an opposite way. Rather than having all that heat build up around the coils behind a refrigerator, the ASHP pumps the thermal energy from outside, into the house. And in the summer, it can work in the opposite direction, by pumping the hot air outside and supplying cooler air inside. The small, high-efficiency, Mitsubishi unit we are installing has the ability to heat our entire 1800sf for less than 25% of standard energy costs. Yay for reduced utility bills!
lights on, lights off?
-

-
we became very familiar with the common symbols used to mark up an electrical plan
(image courtesy of make-my-own-house.com)
-

- kitchen mock up – we used assorted construction materials & tools to space out the countertops and islands in the kitchen to aid in outlet & lightning decisions
-

- wire maze
-

- wires, wires everywhere
Lately, it seems the “big” decisions are becoming more of a daily routine, versus the weekly spacing we enjoyed for so many months. I always feel a little anxious any time we make a bigger decision, because I put so much weight into “doing it right the first time.” When the house is done, if there are any aspects that we’re unhappy about, we really will have no one to blame but ourselves. Building from scratch seems to involve more pressure for me. In the past, when we have bought houses, we have obviously really loved them in order to put such a large investment into them. But you can totally love a house you buy and still have lots of “this house is great, buts…” I wish the entry way was larger, I wish there was another closet, I wish the dishwasher was on the other side of the sink, I wish we had a light switch here….
So here we are and it’s time to make the decisions as to what light fixtures we want and where all the lights and switches are going to go. In order to do this, we printed up a nice large floor plan, used some building materials & saw-horses to mock up our kitchen counters, island & dining table, and walked around the house – many times – pretending all the reasons we might be entering or exiting a room/area. With only a few minor disagreements and compromises, we were able to work everything out to the best of our ability in a few hours. And yet, I am sure we still will have 1 or 2 regrets/should haves. In an effort to avoid a regret in the dining & living room areas, we are leaving some lighting placement for the future. We have a general of idea how we’ll live in the space, but realize, we need a few weeks to a month of actually living there with our stuff to get the perfect flow.
But for now, we get what we get, because the electricians have completed their wiring project. No longer can we walk between the wall framing from room to room, as we now have what looks like a giant maze of yellow wire. I keep waiting for things to slow down, but thus far, it still feels to me like it’s moving quickly.
seal that house!
-

- Sealing the house: Prime.
-

- Sealing the house: Place tape in tacky primer.
-

- Sealing the house: Peel the backing off the tape. The backing is split so it comes off each side of the fold.
-

- Sealing the house: The tape is smoothed out and pressed down with a plastic putty knife.
-

- Sealing the house: A taped rim board around the rough opening for the window.
-

- 4″ screws for securing TJIs though the osb and into the wall studs.
-

- Zander securing a TJI .
-

- More TJIs are up.
Yesterday was spent doing more air sealing. Lots of blue tape anywhere there’s a crack in the “air barrier”. We will have an airtight house in order to facilitate the complete control of the temperature inside and minimize energy loss. We should be able to reduce our energy consumption by up 90% in comparison to a “normal” house this size because the majority of our heat will be generated through solar gain (passive solar energy through the windows) and the typical heat generated by our major appliances and our own bodies. The rest will be made up (in our case) primarily by the tiny little wood stove we are putting in and (to make the mortgage lenders happy) an Air Source Heat Pump.
Also yesterday, more of the TJI beams were mounted on the house, using 4″ screws. Electricians come today.
If there’s anything specific you would like us to explain or talk about in a post, please let us know in the comments. We are happy to answer specific questions.
half a cord of wood…
-

- cross section of the house envelope
-

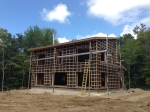
- progress as of June 8th
-

- TJIs (truss joist i-beams)
… that’s what our designer says we’ll need to heat our house. Just half a cord. Really? We used around 6 to 8 cord a year in our last house. So let’s talk about why this house will need so much less.
14 inch thick walls, 12 inches of insulation below the slab, 30 inches of blown in cellulose insulation in the roof and a little sunshine is enough to keep our house warm and cozy, even with -40F temps possible in January.
In the cross-section picture, you can get a general idea of the barrier between us and “the outside world.” In the image of our house in progress, you can see how this is beginning to take shape. The view is from the north corner of the east side of the house. Thus far, the interior 2×4 wall and OSB sheathing have been put in place. The seams between the OSB sheets have been covered with an air sealing tape (the dark blue lines you see). On the north wall of the second story, you can see the grid of strapping over the house-wrap weather barrier. Behind that wrap, are 12 inch TJIs (truss joist i-beams) placed vertically approximately 24 inches apart. Between those, we will blow in cellulose insulation.
The house will be extremely well sealed and insulated. To prevent us from suffocating inside, we will have an energy recovery ventilation system, which will provide a complete exchange of air over the course of a 3 hour period.
We tend to be skeptical/practical/prepared, so we’re stacking a minimum of a cord of wood for next winter. We also know that over the first couple of years, the construction materials will still be drying out/curing so the house will not perform at peak efficiency right away. But we are really excited to see how things go next winter!
stormy weather headed our way
-

- roof truss delivery
-

- drilling the well
Some great progress has been made on our house over the past few weeks. But today, the construction crew called it quits early because of a threat heavy rain, high winds & lightning. Roof trusses were delivered this morning and have been placed on top of the house. They weren’t sure they could get them all in place and secured before the inclement weather arrived, so putting them up will wait until tomorrow. However, the well drilling company stayed on site and our fingers are crossed that it goes well and stays at/under budget.
In other news, our fabulous builder got a line on some discontinued TJIs (Truss Joist I-Beams – which are integral in the design of our 14″ thick walls). The fact that they are discontinued in no way affects our ability to use them, but it has resulted in a substantial 40% savings!
In the coming weeks, we will spend more time posting information about our construction plans and the techniques and materials we are implementing. Passive solar construction is often thought of as an expensive endeavor, out of reach for the average home owner. With the help of our designer, our builder, and the use of common construction materials, we are aiming to build our extremely energy efficient, passive solar house at or below the typical construction cost of a “standard” home. We are very excited about this and hope to spread the word that it can be done, so that more people will be able to live with lower energy bills and smaller carbon footprints.
